Guide to build web app with authentication and REST API with token authentication
Last updated
Antonio Ufano
In this article I'm going to explain how to create a simple web application to create tasks with the authentication included in Laravel. Then we'll create an API that will manage access tokens and expose some of the functionalities and finally test the API with Postman. If you do are not familiar with Laravel, you can check my previous article about how to set up a development environment. All the code of this article is available to download in the following GIT repository. Let's dig into it!
Creating a Laravel web app
Create a new Laravel application:
$laravel new api-oauth2-demo
Create authentication tables, views, controllers and middleware:
$php artisan make:auth
For this example I'll create a To Do List application so we'll need a Task model:
$php artisan make:model Task -m
* with the -m argument we create a migration too.
Now we modify the migration (inside the database/migrations folder) to include the following columns in the table: name (string), description (text), completed (boolean), user_id (integer):
public function up(){

    Schema::create('tasks', function (Blueprint $table) {

      $table->increments('id');

      $table->string('name');

      $table->text('description');

      $table->boolean('completed');

      $table->integer('user_id');

      $table->timestamps();

    });

}
Now we have to configure our database connection details in the .env file in the root folder of the application. Once done, we can run a migration to create both the Auth tables (users, password_resets) and our tasks table:
$php artisan migrate
Once migrated, first thing to do is to modify our User and Task models to define the relationship between them. A user can have many tasks and, a task always belongs to a user.
User model:
//relationship with Task model

public function tasks(){

  return $this->hasMany('App\Task');

}
In the Task model we'll also create two scopes. Scopes are used when you have to filter data very frequently in your application. In this case we create two, one for completed tasks and another for pending ones, which will filter using the 'completed' column of the Tasks table.
  //relationship with User model

  public function user_id() {

    return $this->belongsTo('App\User');

  }

  public function scopeCompleted($query) {

    return $query->where('completed', true);

  }

  public function scopePending($query) {

    return $query->where('completed', false);

  }
Now we will create a controller that will handle web requests to create, list and complete tasks.
$php artisan make:controller TaskController --resources
*the resources option will create all CRUD methods empty
Now we fill all methods in the controller. The show, index, create and edit methods will just return the correspondent page to show, list, create or update the tasks while store, update and destroy methods will be the ones that will interact with the database. I've also created a new method called complete to change the completed column to true.
  public function index() {

        //returns the completed and pending tasks of the logged user

        $user = Auth::user();

        $tasks_completed = $user->tasks()->completed()->get();

        $tasks_pending = $user->tasks()->pending()->get();

        return view ('tasks.index', ['tasks_completed' => $tasks_completed, 'tasks_pending' => $tasks_pending]);

  }

    /**

     * Store a newly created resource in storage.

     */

    public function store(Request $request)  {

        //create new task

        $task = new Task;

        //associate values from the view form

        $task->name = $request->name;

        $task->description = $request->description;

        $task->completed = false;

        //retrieve logged user

        $user = Auth::user();

        //associate user to the new task to fill the user_id column in table

        $task->user()->associate($user);

        //save task in database and redirect

        $task->save();

        return redirect()->route('tasks.index');

    }

    public function complete($id)  {

        //change the completed flag to true

        $task = Task::findOrFail($id);

        $task->completed = true;

        $task->save();

        return redirect()->route('tasks.index');

    }
You can see the full code of the controller here. Notice that I've included a __construct function that calls the 'auth' middleware. This will prevent to do any of the actions listed if the user is not logged.
Now we have to define the routes that our views will use. In the routes folder modify the web.php file and include the routes to list (return view tasks.index), create (return view tasks.create), store (calls store method to store the task in the database) and complete (calls complete method to update the complete attribute of the task) :
Route::get('/tasks', 'TaskController@index')->name('tasks.index');

Route::get('/tasks/create', 'TaskController@create')->name('tasks.create');

Route::post('/tasks', 'TaskController@store')->name('tasks.store');

Route::post('/tasks/{id}/complete', 'TaskController@complete')->name('tasks.complete');
For our views, we'll create a new folder called 'tasks' inside /resources/views. You can see all my views in the repo.
In the index we'll display a list of the completed and pending tasks. As detailed in the controller above, in the index function we return the completed tasks in the variable $tasks_completed and the pending ones in $tasks_pending, so we just have to loop both arrays and print the details of each. In addition, each of the pending tasks will have a form with a button to mark the task as completed.
  <div class="container-fluid">

    @if(isset($tasks_pending))

    <h3>Pending tasksh3>

      @foreach($tasks_pending as $task)

      <div class="card card-body mb-2">

        <form action="{{route('tasks.complete', $task->id)}}" method="post">

            {!! csrf_field() !!}

            <h4>{{$task->name}} h4>

            <p>{{$task->description}} p>

            <input type="submit" class="btn btn-warning" value="complete">

        form>

      div>

      @endforeach

    <h3>Completed tasksh3>

      @foreach($tasks_completed as $t)

      <div class="card card-body mt-2 mb-2">

        <h5>{{$t->name}} h5>

        <p>{{$t->description}} p>

      div>

      @endforeach

    @endif

 </ div>
The create view will just have a form with all the Task fields. Just keep in mind to use the same ids in the inputs to the ones we used in our Controller to assign the name and description to the task.
<form action="{{route('tasks.store')}}" class="mb-3" method="post" enctype="multipart/form-data">

    {!! csrf_field() !!}

    <div class="row">

      <div class="form-group col-sm-12">

        <label for="name" class="control-label">Task Namelabel>

        <input name="name" class="form-control" type="text" id="name">

      </div>

   </div>

    <div class="row">

      <div class="form-group col-sm-12">

        <label for="description" class="control-label">Descriptionlabel>

        <textarea name="description" id="description" class="form-control" cols="50" rows="10">textarea>

     </ div>

    </div>

    <div class="row">

      <div class="form-group col-sm-12">

        <input type="submit" class="btn btn-success" value="Create task!" role="button">

      </div>

    </div>

  </form>
And that's all we need for now. We've build a web application that allow users to register and login and then create tasks, list them and flag them as completed. All files of this application can be found in the following repository.
Create the API
Creating an API in Laravel is very simple. We just need to define the routes we want to expose in the file /routes/api.php and then create a new controller to handle the requests. The controller we created for our web application always returned views (pages) while the API would need to return JSON objects. We could control the type of request and adapt the response in a single controller but to keep the web and the API independent and make it more clear, we'll use separate controllers.
Let's create the controller for our API inside an Api folder:
$php artisan make:controller Api/TaskController
Now we will create three methods to list, store and complete Tasks. They will be similar to the ones we created in our web controller although this ones will return a JSON object and an HTTP code. For example to create Tasks:
public function store(Request $request) {

//create new task

    $task = new Task;

    //asign values from view

    $task->name = $request->name;

    $task->description = $request->description;

    $task->completed = false;

    //retrieve user with api guard using api_token

    $user = Auth::guard('api')->user();

    //associate user to the new task to fill the user_id column in table

    $task->user()->associate($user);

    //save in database

    $task->save();

    //return new task and http code

    return response()->json([$task], Response::HTTP_CREATED );

  }
You can see the controller with all the methods in this link of the repository.
Now we have to define the routes of our API similar to what we did for our web routes. In this case we have to include them in routes/api.php
Route::get('/tasks', 'Api\TaskController@index')->name('api.tasks.index');

Route::post('/tasks', 'Api\TaskController@store')->name('api.tasks.store');

Route::post('/tasks{id}/complete', 'Api\TaskController@complete')->name('api.tasks.complete');
And that's all we need to expose these methods via API. We can test them using Postman. For example to get the lists of tasks we can launch a GET request to http://127.0.0.1:8000**/api/**tasks . Note that we have to include api in the URL.
Laravel API authentication
In our web controller we protected all our methods from non logged user with the Auth middleware, which takes care of handling the login and keeping a session until the user logs out. For our API we will need to adapt this system to generate an API token when the user logs in and then check if it's included and valid when the API receives a requests.
In case we wanted to expose our API to other applications we could use Passport, which will manage clients and tokens and is based on OAuth2 . Similar to the authentication service we used for our web app, Passport will use its own set of tables. The official documentation is pretty good so in case you want to manage other apps/clients using your API you should consider using it. In our case, we just want a simple authentication based on our User model so we'll just have to adapt it a little bit.
Update: you can use Passport to manage the authentication to consume your own API. You can find a detailed how to in this article.
These are the steps we have to follow in order to manage requests to our API:
-
Modify the User to manage the api_token.
-
Create a new controller to handle login and logout actions via API requests.
-
Generate the api_token when a user logs in.
-
Protect our API Task methods from non logged users in the Api\TaskController.
-
Delete the api_token when a user logs out.
-
Define API routes for login and logout.
Let's see how to do all of them in detail
Modify the User to manage the api_token
First we'll need to add a new api_token field (string 60 chars long) to our Users table with a migration:
$php artisan make:migration add_api_token_to_users_table --table=users
    public function up() {

        Schema::table('users', function (Blueprint $table) {

            //add a 60char api_token

            $table->string('api_token', 60)->unique()->nullable();

        });

    }
$php artisan migrate
Now we have to create a new method in the User model to generate the api_token, which will be a random 60 characters string:
    //function to generate an api_token

    public function generateToken() {

        $this->api_token = str_random(60);

        $this->save();

        return $this->api_token;

    }
Create a new controller to handle login/logout via API requests
Pretty simple with artisan:
$php artisan make:controller Auth\ApiLoginController
Create the api_token on login
When a user logs in we have to generate the api_token using the method we just created in our User model. As we'll manage the API login and logout actions in Auth\ApiLoginController (the controller we just created) we'll include the method in it:
    //override login method from trait

    public function login(Request $request){

      $this->validateLogin($request);

      if ($this->attemptLogin($request)) {

        $user = $this->guard()->user();

        //generate api_token

        $user->generateToken();

        return response()->json([

            'data' => $user->toArray(),

        ]);

      }

     return $this->sendFailedLoginResponse($request);

    }
Protect Laravel API methods from non logged users
This one is pretty similar to what we did in the controller that handles the web requests although this time we just have to tell our controller to use the 'auth:api' middleware, which basically means that it will search for our api_token instead of a user/password.
//To protect from non logged

public function __construct(){

$this->middleware('auth:api', ['only' => ['index', 'store', 'complete']]);

}
This auth:api references the api guard you can find in the config/auth.php file. We have to change it to use the driver 'token' for API authentication:
    'guards' => [

        'web' => [

            'driver' => 'session',

            'provider' => 'users',

        ],

        'api' => [

            'driver' => 'token',

            'provider' => 'users',

        ],

    ],
Note: Going deep into the Laravel files, the above configuration will use the SessionGuard.php for web routes and TokenGuard.php for api routes in the authentication. You can find these files in vendor/laravel/framework/src/Illuminate/Auth. In TokenGuard.php you can see that it will try to find an 'api_token', the same column name we've used in our users table :)
Delete the api_token on logout
We'll just have to create a logout method in our Auth\ApiLoginController to remove the api_token when the user logs out. This way if the user (or someone else) tries to run a request using an old token, the application will reject it.
  //override logout method from trait

public function logout(Request $request) {

    $user = Auth::guard('api')->user();

    if ($user) {

        $user->api_token = null;

        $user->save();

    }

    return response()->json(['data' => 'User logged out.'], 200);

}
Define API routes for login and logout
In our routes/api.php file we'll just have to add the routes to point requests to /login and /logout to the methods we just created in Auth\ApiLoginController. These would be all our routes:
Route::post('/login', 'Auth\ApiLoginController@login');

Route::post('/logout', 'Auth\ApiLoginController@logout');

Route::get('/tasks', 'Api\TaskController@index')->name('api.tasks');

Route::post('/tasks', 'Api\TaskController@store')->name('api.tasks.store');

Route::post('/tasks/{id}/complete', 'Api\TaskController@complete')->name('api.tasks.complete');
Testing the API
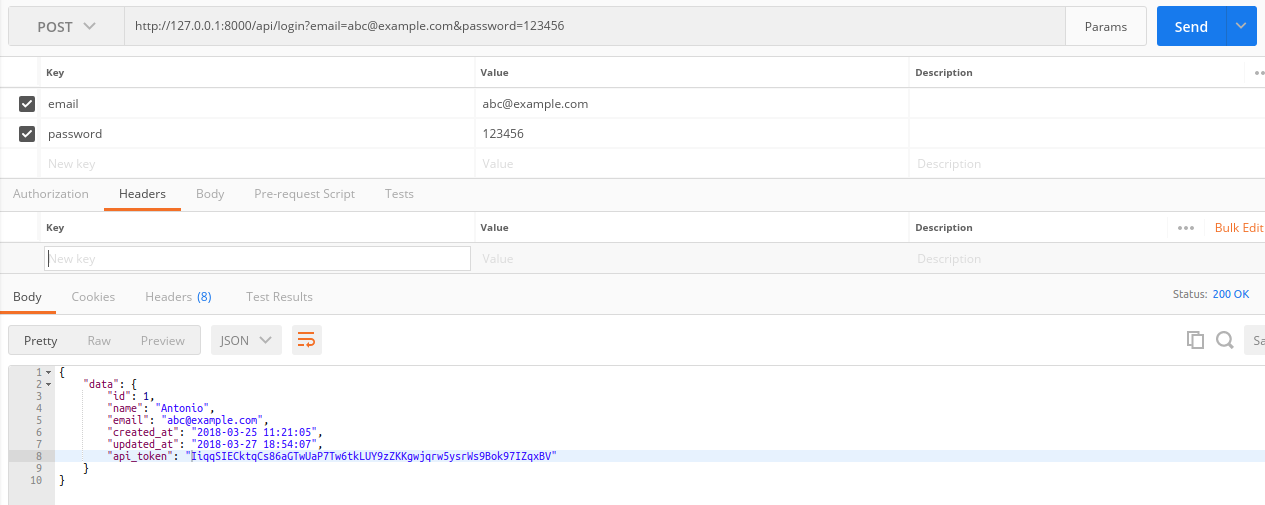
In order to test our brand new API we can use Postman. With our server running ($php artisan serve), the first thing we need to do is launch a POST request to http://127.0.0.1:8000/api/login with the user credentials (email and password) as params. If credentials are correct we'll receive a User object with all the information, including the api_token:
_
_
The api_token is returned with all the user details
As we protected all our Task methods from non logged users, we'll have to provide this token to get the list of tasks, create a new one or complete it. To get the list of tasks of the user we'll launch a GET request to http://127.0.0.1:8000/api/tasks including the api_token as a parameter

And to store a new Task, we'll launch another POST request to http://127.0.0.1:8000/api/tasks including the api_token and the new task data, name and description, all of them as parameters:

Summary
We've built a web application with a registration/login system where our logged users can create tasks, query them and complete them. In addition we've exposed the same functionality with an API so we could build a different application to consume it or even a front end in Vue.js (or Angular, React...) to transform our web in a Single Page Application. This is just a basic example of an API authentication to get familiar with tokens and how they work. Since version 5.3 Laravel includes Passport which is a more robust solution so you should consider checking the official documentation or this video introduction in Laracasts.
Hope you enjoyed this article.
Happy coding!
If you enjoyed this article consider sharing it on social media or buying me a coffee ✌️
Oh! and don't forget to follow me on Twitter where I share tons of dev tips 🤙
Other articles that might help you
my projects
Apart from writing articles in this blog, I spent most of my time working on my personal projects.
theLIFEBOARD.app
theLIFEBOARD is a weekly planner that helps people achieve their goals, create new habits and avoid burnout. It encourages you to plan and review each week so you can easily identify ways to improve your productivity while keeping track of your progress.
Sign upSolidityTips.com
I'm very interested in blockchain, smart contracts and all the possiblilities chains like Ethereum can bring to the web. SolidityTips is a blog in which I share everything I learn about Solidity and Web3 development.
Check it out if you want to learn SolidityQuicktalks.io
Quicktalks is a place where indie hackers, makers, creators and entrepreneurs share their knowledge, ideas, lessons learned, failures and tactics they use to build successfull online products and businesses. It'll contain recorded short interviews with indie makers.
Message me to be part of it