Understanding OAuth2 authentication to use Google APIs in a CLI program
Last updated
Antonio Ufano
Up until now I've never had the need to use any of the Google API's but recently I needed to get the information of all the flights I had taken in the last five years and, although I have the information of those in my Google Calendar, the app doesn't allowed me to extract it so that was the perfect opportunity to dig into how Google API's work. After a quick research in the Calendar API documentation, my plan was to build a small command line application in Node.js that would:
- Ask the user for some filters, like a date range, keywords and number of results to retrieve.
- Authenticate with Google
- Search for the events in the user's calendar applying those filters
- Write the results in console and in a file
Thanks to the examples provided in Google's documentation I was able to retrieve the data from my calendar quite quickly but understanding how it worked was a little tricky so I decided to refactor the code to use async/await instead of callbacks to fully understand what it was doing and make it more reusable. Then I wrapped around it a command line program to include the filter functionality. This is how I did it 😎
Google Calendar API documentation and example
First thing I did was to reach to the Events resource page as that's what I wanted to retrieve from my calendar. There are a few methods for this resource and, luckily for me, the list() method returns a list of events and accepts some query parameters, just what I was looking for. Then I searched for some examples written in Node.js and found the quickstart page in which it's explained how to create a simple command-line application with 3 simple steps:
- Enable the Google Calendar API
- Install the googleapis Node.js package
- Copy the code example and run it
As detailed in the docs, the first time it runs, the application will ask you to authorise access by visiting a URL. Although this worked ok and I got a list of events, I didn't understand how the authentication process worked so I searched more information and found this section about the different authentication methods (OAuth2, Service-Service and API Key) and this link about the OpenID Connect specification used in the OAuth2. Once I built a foundation on how the authentication works and decided which method I wanted to use use (OAuth2), I was ready to start coding my app from scratch using as a reference the code example provided in the docs.
Authenticating to use Google APIs
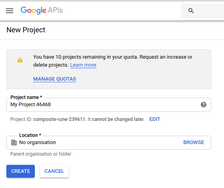
First thing to do when using any Google API is to go to Google's developer console and create a new project:
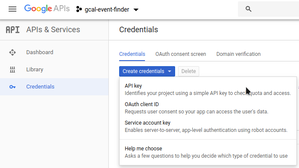
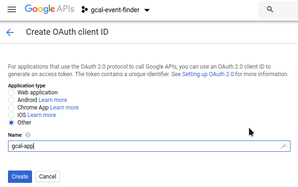
Once created, go to the Library section and search for the Google Calendar API (or any API you want to consume) and Enable it. This means once authenticated, your application will be able to reach the selected API. Now go to the Credentials section and create a new set of credentials of type OAuth client ID. In the next page it will ask you the Application type. As I want to create a command line program, I selected Other and gave it a name:
Once done, you'll get a client_id and client_secret associated to your project. You can download them in a JSON file which also contains a other properties, like token_uri (where we'll request an access token) and redirect_uri (where to redirect once authorised, in our case, just localhost). Download the file as we'll need it later for our CLI program.
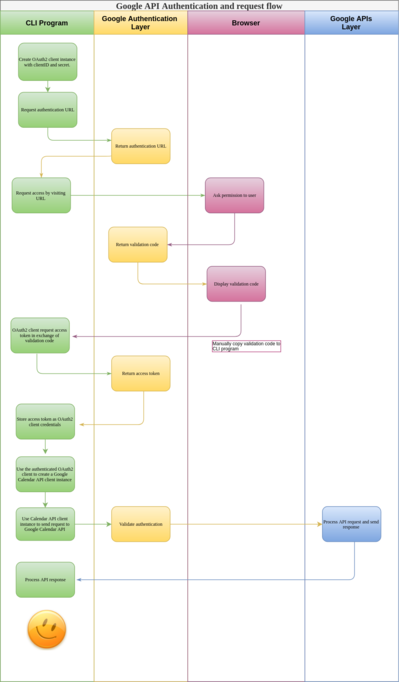
But why do we need these IDs and how are they used? I've tried to explain the oAuth2 authentication process in the following diagram:
In summary, the authentication flow will be:
- Use the client_id and client_secret to create an OAuth2 client instance
- Request Google an authentication URL
- Ask the user to visit the authentication URL and accept that our program will access his Calendar events (this is based on the scope we define, explained later...)
- Once user accepts, Google Authentication will return a validation code
- The Validation code is manually passed to our CLI program
- CLI Program request an access token in exchange of the validation code
- Save the access token as the OAuth2 client credentials
- Save access token to the file system so it can be reused in following requests
All these steps are done in the code example provided in the Google quickstart guide but I refactored it to use async/await and put it in a separated module (googleAuth.js in GitHub) so I can reuse it for other programs if I want to. This module exports a function to generate an authenticated OAuth2 client. The code is the following:
/**
* googleAuth.js
*
* Generates an OAuthClient to be used by an API service
* Requires path to file that contains clientId/clientSecret and scopes
*/
const {google} = require('googleapis');
const fs = require('fs');
const inquirer = require('inquirer')
const debug = require('debug')('gcal:googleAuth')
// The file token.json stores the user's access and refresh tokens, and is
// created automatically when the authorization flow completes for the first
// time.
const TOKEN_PATH = 'token.json';
/**
* Generates an authorized OAuth2 client.
* @param {object} keysObj Object with client_id, project_id, client_secret...
* @param {array<string>} scopes The scopes for your oAuthClient
*/
async function generateOAuthClient(keysObj, scopes){
let oAuth2Client
try{
const {client_secret, client_id, redirect_uris} = keysObj.installed
debug('Secrets read!')
// create oAuthClient using clientId and Secret
oAuth2Client = new google.auth.OAuth2(client_id, client_secret, redirect_uris[0])
google.options({auth: oAuth2Client});
// check if we have a valid token
const tokenFile = fs.readFileSync(TOKEN_PATH)
if(tokenFile !== undefined && tokenFile !== {}){
debug('Token already exists and is not empty %s', tokenFile)
oAuth2Client.setCredentials(JSON.parse(tokenFile))
}else{
debug('🤬🤬🤬 Token is empty!')
throw new Error('Empty token')
}
return Promise.resolve(oAuth2Client)
}catch(err){
console.log('Token not found or empty, generating a new one 🤨')
// get new token and set it to the oAuthClient.credentials
oAuth2Client = await getAccessToken(oAuth2Client, scopes)
return Promise.resolve(oAuth2Client)
}
}
/**
* Get and store access_token after prompting for user authorization
* @param {google.auth.OAuth2} oAuth2Client The OAuth2 client to get token for.
* @param {array<string>} scopes The scopes for your oAuthClient
*/
async function getAccessToken(oAuth2Client, scopes) {
const authUrl = oAuth2Client.generateAuthUrl({
access_type: 'offline',
scope: scopes,
});
console.log('⚠️ Authorize this app by visiting this url:', authUrl);
let question = [
{
type: 'input',
name: 'code',
message: 'Enter the code from that page here:'
}
]
const answer = await inquirer.prompt(question)
console.log(`🤝 Ok, your access_code is ${answer['code']}`)
// get new token in exchange of the auth code
const response = await oAuth2Client.getToken(answer['code'])
debug('Token received from Google %j', response.tokens)
// save token in oAuth2Client
oAuth2Client.setCredentials(response.tokens)
// save token in disk
fs.writeFileSync(TOKEN_PATH, JSON.stringify(response.tokens))
return Promise.resolve(oAuth2Client)
}
module.exports = {generateOAuthClient}
Once we have an OAuth2 client with a valid access token, we can use it to query the Calendar API.
Retrieving events from Google Calendar in Node.js
To interact with the Calendar API I created another module (calendarService.js in GitHub) which exports a single function getEvents() that receives as parameters the OAuth2 client (already authenticated) and a filter object. Then it builds the filterBy object by adding the calendarId, transforms the date ranges, adds other values like the orderBy and maxResults, and finally it calls the events.list() method.
/**
 * calendarService.js
 *
 * Methods to interact with the Google Calendar API
 *
 */
const { google } = require('googleapis')
const debug = require('debug')('gcal:calendarService')

/**
 * creates a Google Calendar instance using the OAuth2 client and call the list events with the filter
 * @param {google.auth.OAuth2} auth The OAuth2 client already authenticated
 * @param {object} filter Properties to filter by
 */
async function getEvents(auth, filter) {
  try {
    const calendar = google.calendar({
      version: 'v3',
      auth,
    })

    const filterBy = {
      calendarId: 'primary',
      timeMin:
        new Date(filter.timeMin).toISOString() ||
        new Date('2014-01-01').toISOString(),
      timeMax:
        new Date(filter.timeMax).toISOString() || new Date().toISOString(),
      maxResults: filter.maxResults,
      singleEvents: true,
      orderBy: 'startTime',
      q: filter.keyword,
    }
    debug('Searching with filter %j', filterBy)
    const events = await calendar.events.list(filterBy)
    debug('found events: ', events)
    return events
  } catch (err) {
    debug('🤬🤬🤬 Captured error in getEvents: %s', err)
    console.log(err)
  }
}

module.exports = { getEvents }
Note: If I wanted to expand this module with multiple functions to call different methods of the API, I could extract the creation of the calendar client out of any function and once created, pass it as a parameter to all of them.
The command line program
The final step was to create a CLI program that asks the user for some filters. I used inquirer to build it as it's pretty easy to use; you just have to define an array of questions and pass them to the prompt method, which resolves a promise with the answers. I also created another async function (triggerCalendarAPI) that first calls the googleAuth.js module passing the client_d and secret (to get the authenticated OAuth2 client) and then calls the calendarService.js module to retrieve the list of events. Once we have the events, we can print it to console or write it to a file. In my case, I write the results to two different files:
- results.json contains just the name, date and location of the retrieved events
- results_raw.json contains all the properties of the retrieved events
Another important thing is that I had to define a simple scope to only read from the calendar API. Depending on the API and the operations you want to consume, you'll have to change it. Different scopes can be found in each API documentation.
/**
 * gCal Event Finder
 * CLI program to search and extract events from the user's calendar
 * using the Google Calendar API. Requires
 *
 */

const fs = require('fs');
const inquirer = require('inquirer')
const figlet = require('figlet')
const calendarService = require('./src/calendarService')
const googleAuth = require('./src/googleAuth')

const debug = require('debug')('gcal:index')

// IMPORTANT!: Define path to your secrets file, which should contain client_id, client_secret etc...
// To generate one, create a new project in Google's Developer console
const secretsFile = './keys/secrets.json'
const secrets = JSON.parse(fs.readFileSync(secretsFile));

// define the scope for our app
const scopes = ['https://www.googleapis.com/auth/calendar.readonly']

/**
 * Function that trigger calls to googleAuth and calendarService to
 * retrieve the events from the calendar API.
 * @param {object} filter with properties maxResults, timeMin, timeMax and keyword
 */
async function triggerCalendarAPI(filter){
  try{
    // get authenticated oAuth2 client
    const oAuth2Client = await googleAuth.generateOAuthClient(secrets, scopes)
    debug('oAuthClient received, getting events....')
    // call the calendar service to retrieve the events. Pass secrets and scope
    const events = await calendarService.getEvents(oAuth2Client, filter)
    debug('Events are %j', events)
    // check if the are events returned
    if(events.data.items.length > -1){
      //write raw results to file
      console.log(`Found ${events.data.items.length} events!`)
      await fs.writeFileSync('./results_raw.json', JSON.stringify(events.data.items))
      let res = [];
      // loop events array to filter properties
      events.data.items.forEach(event => {
        const start = event.start.dateTime || event.start.date;
        res.push({date:start,summary:event.summary, location: event.location})
      });
      //write filtered properties to another file
      await fs.writeFileSync('./results.json', JSON.stringify(res))

      console.log(`👏👏👏 - Results extracted to file results.json and results_raw.json`)
      return Promise.resolve(events)
    }else{
      throw new Error('🤯 No records found')
    }

  }catch(err){
    console.log('🤬🤬🤬 ERROR!!!' + err)
    return Promise.reject(err)
  }
}

/**
 * #########  Starts CLI program  #################
**/

console.log(figlet.textSync('gcal-finder', { horizontalLayout: 'full' }))
console.log(`Let's find some events in your calendar 🤔!`)

let filter = {};
let questions = [
{
  type: 'input',
  name: 'nResults',
  message: 'How many results do you want to retrieve? (default 100)'
},
{
  type: 'input',
  name: 'dateFrom',
  message: 'Start date (YYYY-MM-DD)? (default 3 months ago)'
},
{
  type: 'input',
  name: 'dateTo',
  message: 'End Date (YYYY-MM-DD)? (default today)'
},
{
  type: 'input',
  name: 'keyword',
  message: 'Search by keyword? (just one 😬  default all)'
},
]

inquirer.prompt(questions).then(answers => {
  const today = new Date();
  const temp = new Date()
  temp.setMonth(temp.getMonth() -3)
  const monthsAgo = temp.toISOString();
  filter = {
    maxResults: answers['nResults'] || 100,
    timeMin: answers['dateFrom'] || monthsAgo,
    timeMax: answers['dateTo'] || today,
    keyword: answers['keyword'] || undefined
  }
  debug('Searching with filter: %j ', filter)

  return triggerCalendarAPI(filter);

}).catch(err => {
  console.log('🤬🤬🤬 Error retrieving events from the calendar' + err)
})
Important: the secrets.json file contains the client_id, client_secret and project_id (among other properties) for our app. You can download the full json file for your app from the credentials section of the Google API developer console. If we were building a web application we could use the redirect_uri property to send the user to a specific URL of our project once logged.
Conclusion
This is the first time I've used a product's API for something I needed personally and, that really opened by mind to all the possibilities this kind of APIs give us. We can extend the product's original functionalities to our or a market need that we identify.
I wanted to share this as a command line program people can install globally using NPM but that would mean I'd have to upload to the repo the client_id and secret of my own project so, instead of doing that, I've uploaded the code to this repo in GitHub and, if you want to run it, you just have to generate a new client_id and secret in your own Google developer console, put them in the secrets.json file and you'll be ready to go.
Hope you find this useful.
Happy coding!
If you enjoyed this article consider sharing it on social media or buying me a coffee ✌️
Oh! and don't forget to follow me on Twitter where I share tons of dev tips 🤙
Other articles that might help you
my projects
Apart from writing articles in this blog, I spent most of my time working on my personal projects.

theLIFEBOARD.app
theLIFEBOARD is a weekly planner that helps people achieve their goals, create new habits and avoid burnout. It encourages you to plan and review each week so you can easily identify ways to improve your productivity while keeping track of your progress.
Sign upSolidityTips.com
I'm very interested in blockchain, smart contracts and all the possiblilities chains like Ethereum can bring to the web. SolidityTips is a blog in which I share everything I learn about Solidity and Web3 development.
Check it out if you want to learn Solidity
Quicktalks.io
Quicktalks is a place where indie hackers, makers, creators and entrepreneurs share their knowledge, ideas, lessons learned, failures and tactics they use to build successfull online products and businesses. It'll contain recorded short interviews with indie makers.
Message me to be part of it


