Understanding the basics of Socket.io
Last updated
Antonio Ufano
After doing a lot of APIs and microservices lately, I've been trying to find new ideas for quick demos to improve my skills. In one of the projects I'm working on, I'm planning to include a feed that is refreshed with the activity of the users in real time. I wasn's sure about how to do it and, at first I thought about using RabbitMQ, but after a quick search I found WebSockets and Socket.io. If you want to learnt what WebSockets are, watch this super quick video to understand the basic concepts.
Instead of builing directly the user's feed for my project, I decided to build a quick chat demo first. There are multiple articles and videos that explain how to create a chat with socket.io but most of them don't explain exactly how all involved parts work together or are just a small demo to run locally but is not "deployable" to production. So I took all those examples as references to build my chat, took notes of everything that wasnt clear for me and built it in a way so it can be deployed to a server (even created a Docker image!). Here are all my notes.
Chat server and client responsabilities
Our chat app server will have following responsabilities:
- Serve the HTML/CSS/JS client files to the users
- Start Socket.io connection
- Serve socket.io library to the clients (optional as clients can also load it from a CDN)
- Broadcast events (like a new chat message) to all clients connected
When a user connects to our server from his browser, he'll receive the HTML/CSS/JS client files which will:
- Load socket.io client library (from our server or from a CDN)
- Stablish connection with the Socket.io running in our server
- Ask user to enter his name so we can identify him in the chat
- Emit and receive events to/from Socket.io running in our server
- Add our own messages to the chat via JavaScript
Chat server in detail
First thing is to start our Node.js project with "npm init" as we'd have to install dependencies later. We can use Node's http module to create a static server that sends our client any type of files, in our case it would be html, css and js. I found this example in the Mozilla docs which was exactly what I was looking for. No framework, just an http server able to send html, css, js, images and more. They also explain how it works line by line so I'll not go into that. I put the server code in a file named server.js. The only things I changed from the Mozilla example are the port number and the path were it reads the files from, as I'll use a folder named "client":
var filePath = './client' + request.url
console.log(filePath)
if (filePath == './client/') {
  filePath = './client/index.html'
}
Next step was to install the socket.io dependency with "npm i socket.io" include it in our server.js file and log something when we detect a connection:
var io = require('socket.io')(app);
// starts socket
io.on('connection', function (socket) {
    console.log('Socket.io started.....')
    // Manage all socket.io events next...
        socket.on('new-connection', (data) => {
        // captures event when new clients join
        console.log(`new-connection event received`)
        .........
    })
});
I've also included how to capture an event called 'new-connection', which for now, will just print something in the console. Now let's move to the client.
Chat client in detail
As mentioned earlier, I placed all our client files (html, css and js) in a folder named client. The index.html file is pretty simple:
- in the header we're loading the socket.io client library, from a CDN although I've also included the code to load it from our own server
- also in the header, we load our script.js file.
- the body only contains a div container for all the chat messages and a form to submit new ones.
You can find the code of the index.html file in this GitHub Gist or directly in the repo.
In the client script.js file, the first thing I did was to connect via socket.io from the client to the server. As I'm loading the socket.io library before the script.js file, I have it available so I can use the _io() _ function to create a socket connected to the server and the emit() function to send a basic event named 'new-connection' and the name of the user:
/**
 * Use io (loaded earlier) to connect with the socket instance running in your server.
 * IMPORTANT! By default, socket.io() connects to the host that
 * served the page, so we dont have to pass the server url
 */
var socket = io()

//prompt to ask user's name
const name = prompt('Welcome! Please enter your name:')

// emit event to server with the user's name
socket.emit('new-connection', { username: name })
At this point, if I start the server using 'node server.js' and open the browser I get the prompt and after entering the name, I'll be connected to the socket server and see something like this in the server console:
$ npm start

> chatsocket.io@1.0.0 start /d/Projects/chatSocket.io
> node server.js

HTTP Server running at http://127.0.0.1:3000/
request  /
./client/
request  /script.js
./client/script.js
request  /style.css
./client/style.css
Socket.io started.....
request  /favicon.ico
./client/favicon.ico
Up to this point, I was able to:
- start a static server that sends the client files and opens the socket.io connection
- connect the clients to the server via socket.io and emit an event called 'new-connection'
- capture the 'new-connection' event in the server and print it to the console
The only things missing to complete the chat application were:
- being able to link messages with the user's names
- add messages we send to the chat-container div
- emit event to the server containing the message sent
- broadcast chat messages received in the server to all clients connected
Adding the messages we send to the chat-container div is something we can do in the client script.js file. We just need to add an event listener to capture when the form is submitted and, whenever that happens, create a new div containing the message inside the chat-container. As this is something I'll have to do also when we receive messages from other users, I created a function called addMessage(data, type) which I can call multiple times. In addition, I trigger an event called 'new-message' sending to the server an object with both the message and the client's socket id.
// get elements of our html page
const chatContainer = document.getElementById('chat-container')
const messageInput = document.getElementById('messageInput')
const messageForm = document.getElementById('messageForm')

messageForm.addEventListener('submit', (e) => {
  // avoid submit the form and refresh the page
  e.preventDefault()
  // check if there is a message in the input
  if (messageInput.value !== '') {
    let newMessage = messageInput.value
    //sends message and our id to socket server
    socket.emit('new-message', { user: socket.id, message: newMessage })
    addMessage({ message: newMessage }, 'my')
    //resets input
    messageInput.value = ''
  }
})

// receives two params, the message and if it was sent by you
// so we can style them differently
function addMessage(data, type) {
  const messageElement = document.createElement('div')
  messageElement.classList.add('message')

  if (type === 'my') {
    messageElement.classList.add('my-message')
    messageElement.innerText = `${data.message}`
  } else if (type === 'others') {
    messageElement.classList.add('others-message')
    messageElement.innerText = `${data.user}: ${data.message}`
  } else {
    messageElement.innerText = `${data.message}`
  }
  // adds the new div to the message container div
  chatContainer.append(messageElement)
}
Note that I also added different styles to the messages depending if they belong to the user or if they are received from others.
Next step is to handle the 'new-connection' and 'new-message' events properly in our server.js. In the 'new-connection' event I stored the client's socket id and the user name as key:values of an object named users. Then in the 'new-message' event, I used the socket id received to find the correspondent user name, and with the broadcast() function, send the message information to all clients connected except the one that emitted the event originally.
// we'll store the users in this object as socketId: username
const users = {}

var io = require('socket.io')(app)
// starts socket
io.on('connection', function (socket) {
  console.log('Socket.io started.....')
  // Manage all socket.io events next...
  socket.on('new-connection', (data) => {
    console.log(`new-connection event ${data.username}`)
    // adds user to list
    users[socket.id] = data.username
    socket.emit('welcome', {
      user: data.username,
      message: `Welcome to this Socket.io chat ${data.username}`,
    })
  })
  socket.on('new-message', (data) => {
    console.log(`new-message event ${data}`)
    // broadcast message to all sockets except the one that triggered the event
    socket.broadcast.emit('broadcast-message', {
      user: users[data.user],
      message: data.message,
    })
  })
})
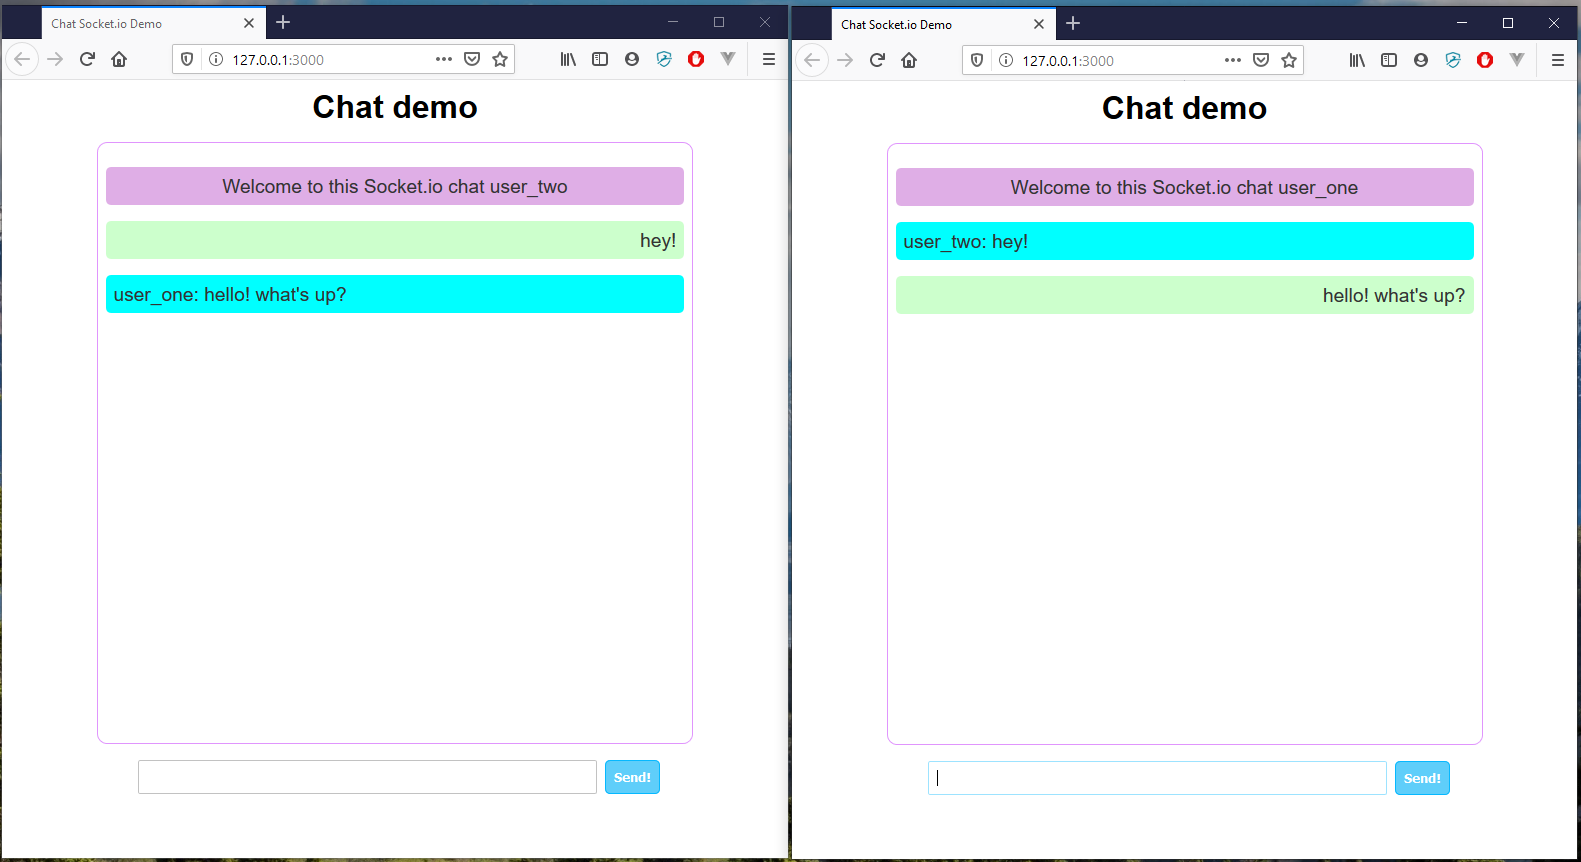
With these last few bits done, I had a fully functional chat application and I could test it by opening multiple browsers locally:
The only thing I havent covered up until now is the styling (which you can find in the style.css file) and minor validations, like making sure users cannot send empty messages. You can find the full code in this repo in GitHub. It also contains a Dockerfile so you can build an image and deploy it anywhere with Docker 🙃 or if you just want to try it online, visit this link.
For this app I just needed to use the emit() and broadcast() functions but Socket.io contains a lot more functionalities like assign namespaces to sockets so they have different endpoints, create rooms and even integrate it with Redis. You can find examples of all those in the docs.
Hope this helps you understand WebSockets and how Socket.io works.
Happy coding!
If you enjoyed this article consider sharing it on social media or buying me a coffee ✌️
Oh! and don't forget to follow me on Twitter where I share tons of dev tips 🤙
Other articles that might help you
my projects
Apart from writing articles in this blog, I spent most of my time working on my personal projects.
theLIFEBOARD.app
theLIFEBOARD is a weekly planner that helps people achieve their goals, create new habits and avoid burnout. It encourages you to plan and review each week so you can easily identify ways to improve your productivity while keeping track of your progress.
Sign upSolidityTips.com
I'm very interested in blockchain, smart contracts and all the possiblilities chains like Ethereum can bring to the web. SolidityTips is a blog in which I share everything I learn about Solidity and Web3 development.
Check it out if you want to learn SolidityQuicktalks.io
Quicktalks is a place where indie hackers, makers, creators and entrepreneurs share their knowledge, ideas, lessons learned, failures and tactics they use to build successfull online products and businesses. It'll contain recorded short interviews with indie makers.
Message me to be part of it