Building APIs FAST with Strapi, an overview
Last updated
Antonio Ufano
I've been using Strapi for a few months in different scenarios, from quick prototypes and small test to more serious projects like the web application I'm working on (thelifeboard.app). Although I've been using it for months, I haven't written an article about it yet and since a few days ago, the Strapi team announced the release of the v3 stable version, what a better time to write one (or maybe more) than now?
So what is Strapi? If you're not familiar with it, this is how they define it in their FAQ
Strapi is an open-source, Node.js based, headless CMS to manage content and make it available through a fully customizable API. It is designed to build practical, production-ready Node.js APIs in hours instead of weeks.
A Content Management System that provides an API in hours. Sounds good, doesn't it? Let's create a simple project to get a taste of it.
A quick example
Let's say we want to build an API to manage books. Only authenticated users can create, edit or delete them but anyone can query them. Our endpoints would be:
- Public
- GET /books -> Returns all books
- GET /books/:id -> Returns a specific book by id
- GET /books/count -> Returns the number of books
- Auth protected
- POST /books -> Create a new book
- PUT /books/:id -> Edit a book by id
- DELETE /books/:id -> Delete a book by id
Database setup
The first thing we need is a database to store our data. Strapi supports SQLite, MySQL, PostgreSQL and MongoDB so you can use any of them. For this example, I'm going to use MongoDB running on Docker, which, for me, it's the easiest way to manage database services in a local development environment. You can check this article in which I explain how to install Docker among other things.
Once you have Docker running, follow these steps:
- Run
docker pull mongoto download the latest MongoDB image - Run
docker volume create mongoDatato create persistent volume in which we'll store the data so it doesn't get lost when we stop/delete our container - Run
sudo docker run --rm -d -p 27017:27017/tcp -v mongoData:/data/db mongo:latestto start the MongoDB container. The -p option will map the local port 27017 to the container's port and the -v option will map the local volume mongoData we just created, to the data/db folder in the container.
Scaffold the Strapi project
To initialize and generate the project we need to run npx create-strapi-app your_project_name. For example npx create-strapi-app demo-strapi. This will start a guided installation. Choose Custom type and select the options as detailed below:
- Choose your installation type: Custom (manual settings)
- Choose your default database client: mongo
- Database name: demo-strapi
- Host: 127.0.0.1
- srv connection: false
- Port (It will be ignored if you enable srv): 27017
- Username: (your database user, default is empty)
- Password: (your database password, default is empty)
- Authentication database: admin
- Enable SSL connection: No
The installation will take a few minutes. Once finished you can start your app running npm run develop from the project folder and the application will start in port 1337 by default.

The first time we start a Strapi application, it will ask you to create an administrator user. This will be the user we'll use to create content types, manage permissions, install plugins etc.
Once the user is created, we'll be in the administration UI and we can start creating our Book model in the Content-Types Builder section. Select Create new collection type and enter the name of the model, in singular. In our case, it would be Book.
Next you'll have to select the different attributes and types for our Book model. I selected the following ones:
- title
- Type: text (short).
- Advanced settings: Required field, Unique field
- pages
- Type: number (integer)
- Advanced settings: Private field
- publishDate
- Type: date (date)
- summary:
- Type: Rich text
- Advanced settings: Required field
As you can see, in the advanced settings we're adding some validations for required and unique fields. We can event include more detailed validations by using a RegExp pattern if we want.
Once our model is defined, click save and the application will restart.
Managing Content within the UI
Now that we have created our Book Content Type we can start adding books directly from the administration UI. Go to the Book Collection Type and you'll see an "Add New Book" button, which will show a form like the one below:
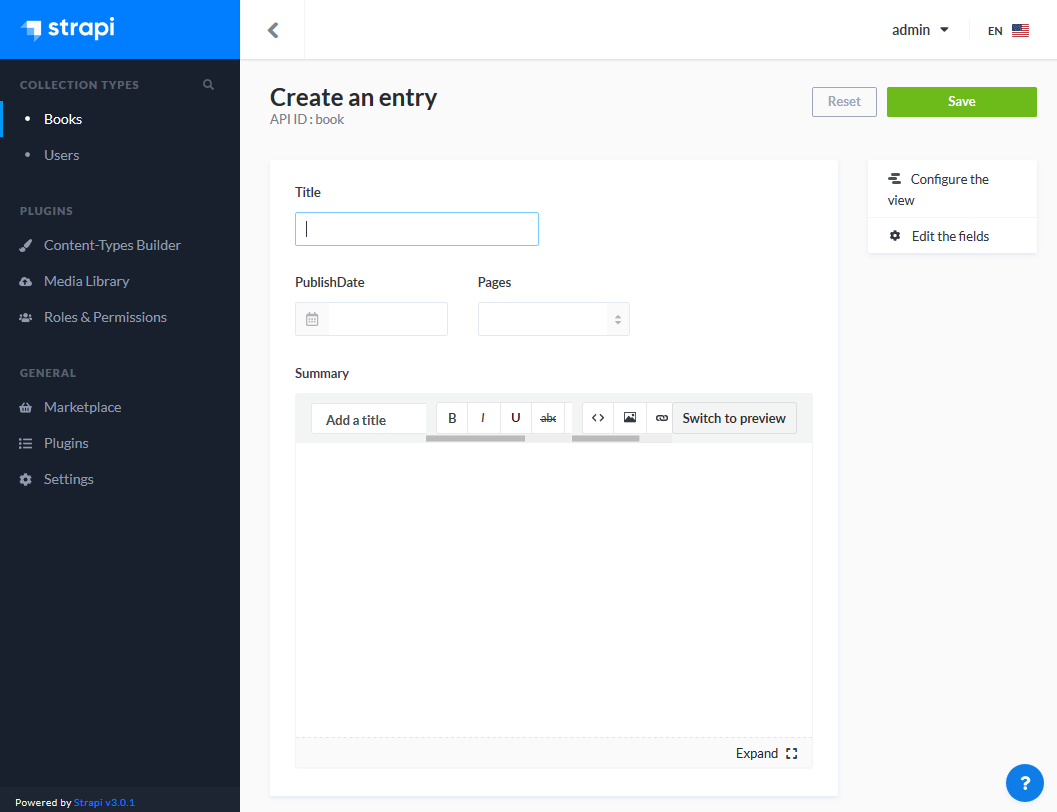
As you can see, the input fields match with the data types of the attributes we selected while creating the content type. From this section of the UI you'll be able to create, edit or delete items for all the content types, which is great but the best part is that Strapi has also generated a REST API we can use to interact with the content types. Let's review how it looks like.
Strapi project structure
Once you've created the first model, if you open the project folder, you'll see that it has generated two folders: config and an api.
Inside the config folder you'll find the application server specific configuration, like the database details (the ones you entered during the installation wizard), the host, port and even a cron.js file in which you can specify scheduled functions to run.
Inside the api folder you'll see one folder for each content type created, in this case one named book. Each one will have the following folders inside: config, controllers, models and services. Inside these folders we have the files we can modify to extend and customize our API:
- In book/config/routes.json we have all our endpoint definitions. Each route has a method, path and handler, which by default points to methods in the controller.
- In book/controllers/book.js we can create the methods that will handle the request to our routes By default, this file is empty as it extends the default Strapi controller which has the following methods: find(), count(), findOne(), create(), update() and delete(). You can extend the functionality of these methods by creating them in this file and adding your own logic (more info here)
- Inside book/models/ we have the books.settings.json which contains the model attributes we defined earlier (title, pages, summary and publishDate) and the book.js model file in which we can add lifecycle hooks, like sending an email every time a book is created for example (more info here)
- Similar as with the controller, in the book/services folder you'll find an empty file book.js, as it extends the default Strapi core service which contains all the following methods: find(), findOne(), count(), create(),update(), delete(), search(), countSearch() (more info here).
By default, the generated REST API will manage basic CRUD operations (Create, Read, Update and Delete) so if this is all you need, you're ready to go 😉.
Setting up the permissions
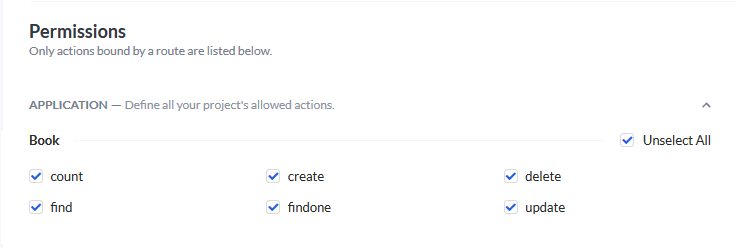
Permission management is Strapi is a pretty straight forward in the Roles & Permissions section of the UI. We have two different roles available by default: Authenticated and Public, although we can create as many roles as we want. To allow actions in each role, select the role and in the Permissions section, you'll see all the Content Types available and all its available routes. You'll just need to select the permitted routes for each role and click save. In my example, I'm allowing all actions for the Authenticated role:
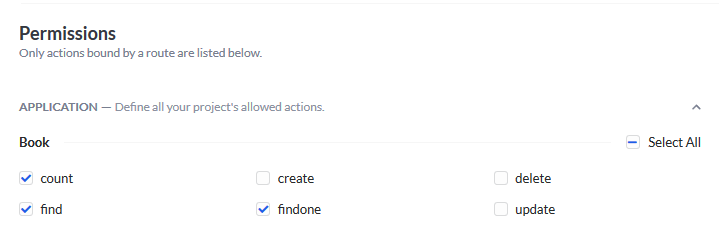
And just the count, find and find one actions for the Public role:
Once permissions are configured, our API is ready to test. But how do we create the users for the Authenticated role? Let's see check that out.
Registering and login users
Strapi provides default endpoints to manage API users. These are:
Register:
- Method: POST
- Endpoint: /auth/local/register
- Required body:
{
  "username": "",
  "email": "",
  "password": ""
}
Login:
- Method: POST
- Endpoint: /auth/local
- Required body:
{
  "identifier": "",
  "password": ""
}
Note: the identifier could be the username or the email.
Both return a similar response, including the user details, role and a JWT:
{
  "jwt": "eyJhbGciOiJIUzI1NiIsCI6IkpXVCJ9.....",
  "user": {
    "confirmed": true,
    "blocked": false,
    "username": "user_one",
    "email": "one@a.com",
    "provider": "local",
    "id": "5ee0cafb6ec1410fda381181",
    "role": {
      "name": "Authenticated",
      "description": "Default role given to authenticated user.",
      "type": "authenticated",
      "id": "5ee0c6f136637b0e7426a2a5"
    }
  }
}
Note: Strapi also provides endpoints to for the forget and reset password functionalities. You can find more info here.
We'd need to send the JWT in the Authorization header in order to access the authenticated protected routes. If we send a request with no JWT (or with an invalid one) to a route only allowed to the authorized role, we'll receive a 403 Forbidden error.
Now we should be able to register a new user, login and with the JWT recived, send a POST request to create a Book.
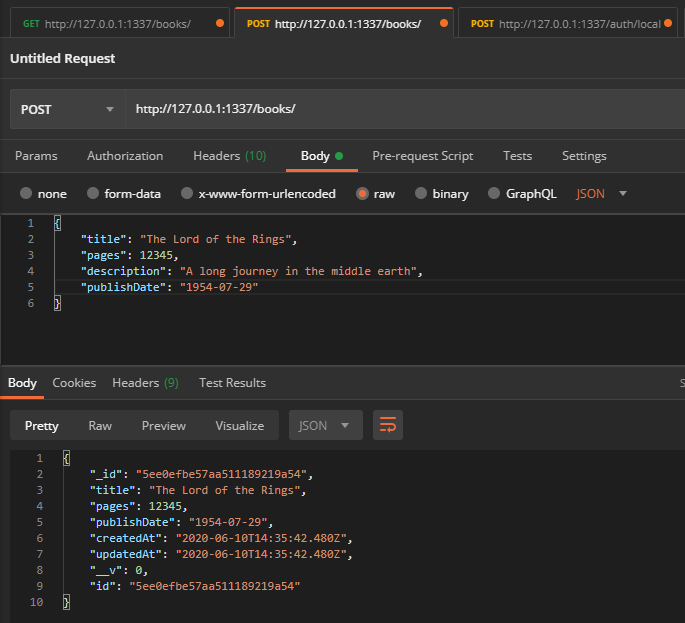
To query the API we just need to send a GET request to /books, no Authentication required.
Conclusion
This was just a quick overview of what Strapi offers. A quick summary would be that Strapi allows you to generate a Node.js REST API with authentication in a matter of minutes. That's the main sell point for me but it offers a lot more. The administration UI allows you to manage the content without the need to create a front end yourself. It has model relationships out of the box, plugins to manage permissions, send emails, manage media files, use OAuth authentication from different providers, GraphQL, Cron jobs and more. These means that you can basically build and entire back-end for your service or application with Strapi.
Other Pros
- It's built in Node.js (for me, it's a pro 😀)
- It's easy to extend the logic of your models or create new endpoints
- File structure is very simple, mainly: api/model_name/* and /config
- Support for .env files, which makes it super easy to deploy to different environments
- Model relationships built within the UI
- The community in Slack is active and super helpful
The not-so-good
Strapi is great, but it's not perfect. Here are a few of the downsides I've faced while using it:
- It's not built in TypeScript
- Model relationship management from the UI is not perfect and sometimes requires you to manually modify the model JSON files. Check the model relationships section of the documentation if you have any issues.
- It may be difficult to find answers online when you face weird errors. Luckily you can go to the Slack channel and ask for help.
- Documentation is good but not perfect although the team keeps polishing it and adding more guides and examples very often. Sometimes I find myself looking at older versions of the docs because they appear first on Google 😐
- API permissions are stored in the DB which means that when we want to deploy a new version of your API which includes permission changes we'll have to manually apply them using the UI in Production or via a database migration.
I hope this article helps you decide if Strapi is a good choice for your next project. I really recommend it as it could help you save time developing APIs (I can't remember how many times I've scaffolded an Express app...). However if you're new to back-end development, you might get lost if you try to add custom functionalities so make sure you get familiar with concepts like routing, controllers, services etc by reading the docs first. And if you have any questions, you can ping me on Twitter or ask the community in the Slack help channel.
Happy coding!
If you enjoyed this article consider sharing it on social media or buying me a coffee ✌️
Oh! and don't forget to follow me on Twitter where I share tons of dev tips 🤙
Other articles that might help you
my projects
Apart from writing articles in this blog, I spent most of my time working on my personal projects.
theLIFEBOARD.app
theLIFEBOARD is a weekly planner that helps people achieve their goals, create new habits and avoid burnout. It encourages you to plan and review each week so you can easily identify ways to improve your productivity while keeping track of your progress.
Sign upSolidityTips.com
I'm very interested in blockchain, smart contracts and all the possiblilities chains like Ethereum can bring to the web. SolidityTips is a blog in which I share everything I learn about Solidity and Web3 development.
Check it out if you want to learn SolidityQuicktalks.io
Quicktalks is a place where indie hackers, makers, creators and entrepreneurs share their knowledge, ideas, lessons learned, failures and tactics they use to build successfull online products and businesses. It'll contain recorded short interviews with indie makers.
Message me to be part of it