Create a serverless subscribe form with AWS Lambda
Last updated
Antonio Ufano
One of the best advices I've read online when starting a new product or service is to create a landing page to explain the problem it solves and its features, then share it online to validate if it's something people will be interested in. It's never being easier to built a static site than today, with no code tools like Webflow or sites with templates like SquareSpace. I've never been a fan of this as I always find that when I have to modify very small details, things get tricky and sometimes are just not possible, so for my last side project I decided to use Vue CLI + Vuetify.
With Vue CLI I can scaffold a static site in minutes and using Vuetify I was able to leverage it's grid system and components to have a fully responsive site without the need of spending too much time creating the components, styling them etc... However when it was time to create a subscribe form I realized I was going to need something else. I didn't wanted to spin up a full back end server just to handle subscribers so I thought this was the perfect situation to use serverless functions as they come with a lot of advantages:
- The code of your function just runs whenever it's triggered
- Most cloud providers have a free tier which should be more than enough for most side projects
- Requires less code so it's easier to maintain
- Faster to develop and deploy than a back end server
As my cloud provider is AWS I used a Lambda function for my subscribe form. This is how I did it:
Creating a subscribe form with Vuetify
With Vuetify it's super easy to create forms using the v-form component. You can add text fields, selectors, text areas, date pickers... whatever you might need. In addition, adding validations for your fields just requires to setup a few rules. There are multiple examples in the Vuetify v-form site, you can see mine in the following gist.
<template>
  <section id="subscribe" class="bg-white">
    <v-container>
      <v-row row wrap>
        <v-col sm="10" offset-sm="1" md="8" offset-md="2">
          <h2 class="display-2 text-center mb-3">Do you want to know more?</h2>
          <p class="subheading text-center">
            Subscribe to receive updates about the project and be one of the
            firsts to access!
          </p>

          <v-form ref="subscribeForm">
            <v-container grid-list-xl>
              <v-row wrap>
                <v-col xs="12" sm="6">
                  <v-text-field
                    v-model="newSub.name"
                    :rules="nameRules"
                    label="Name"
                    required
                  ></v-text-field>
                </v-col>

                <v-col xs="12" sm="6">
                  <v-text-field
                    v-model="newSub.email"
                    :rules="emailRules"
                    label="E-mail"
                    required
                  ></v-text-field>
                </v-col>
                <v-col v-if="showAlert" xs="12" md="6" offset-md="3">
                  <div :class="`text-center mb-1 alert ${alertType}`">
                    {{ alertMessage }}
                  </div>
                </v-col>
                <v-col xs="12" sm="4" offset-sm="4" class="text-center">
                  <v-btn
                    large
                    :loading="isLoading"
                    color="#782fff"
                    class="font-weight-bold text-none white--text"
                    @click="handleSubscribe"
                    >Subscribe!</v-btn
                  >
                </v-col>
              </v-row>
            </v-container>
          </v-form>
        </v-col>
      </v-row>
    </v-container>
  </section>
</template>

<script>
import SubscriberService from '@/services/SubscriberService'
export default {
  data() {
    return {
      isLoading: false,
      showAlert: false,
      alertType: 'ok',
      alertMessage: '',
      newSub: {
        name: '',
        email: '',
      },
      nameRules: [(v) => !!v || 'Name is required'],
      emailRules: [
        (v) => !!v || 'E-mail is required',
        (v) => /.+@.+/.test(v) || 'E-mail must be valid',
      ],
    }
  },
  methods: {
    handleSubscribe() {
      console.log('Subscribing....')
      this.isLoading = true
      if (this.$refs.subscribeForm.validate()) {
        SubscriberService.postSubscriber(this.newSub)
          .then((res) => {
            this.isLoading = false
            this.alertMessage = 'You have successfully subscribed 🥰'
            this.showAlert = true
            this.$refs.subscribeForm.reset()
          })
          .catch((err) => {
            this.isLoading = false
            this.alertType = 'error'
            this.alertMessage =
              '🤕 There was an error subscribing you. Please try again'
            this.showAlert = true
          })
      } else {
        this.isLoading = false
      }
    },
  },
}
</script>

<style scoped>
.bg-white {
  background-color: white;
}
h1,
h2,
h3 {
  color: #782fff;
}
.alert {
  padding: 0.7rem;
}
.alert.ok {
  background-color: rgba(78, 205, 196, 1);
  border-radius: 5px;
}
.alert.error {
  background-color: red;
  color: white;
}
</style>
As you can see the template is done using v-row and v-col to wrap everything and the form contains two v-text-field binded to the data attributes newSub.name and newSub.email . The submit button triggers the handleSubscribe function which firsts validates if the fields contain valid data and if so, calls the postSubscriber function from the SubscriberService, a file that will contain all the necessary code to trigger the AWS Lambda function. In the component data I also included the following variables:
- isLoading: will take care of displaying a loading animation in the submit button. I'll change it to true as soon as the button is clicked and turn it to false as soon as I receive a response from the API, sucessful or an error.
- showAlert: will be used to display or not a message to the user.
- alertType: defaulted to 'ok'. If the subscription request fails, I'll change it to 'error'. I'll use this values in different css classes in the style section of the component: alert-ok will have a green background and alert-error will have a red background.
- alertMessage: will contain the message for the alert.
The SubscriptionService file will use axios to trigger the request to our Lambda function so you'll need to install it via npm/yarn. This is the code of the whole file:
import axios from 'axios'

const apiClient = new axios.create({
  baseURL: `${process.env.VUE_APP_SUBSCRIBE_API}`,
  withCredentials: false,
  headers: {
    Accept: 'application/json',
    'Content-Type': 'application/json',
  },
})

export default {
  async postSubscriber(subscriberDetails) {
    try {
      const res = await apiClient.post('/subscribers', subscriberDetails)
      console.log(`Posted ok! ${res.data}`)
      return res
    } catch (err) {
      console.error(err)
      throw err
    }
  },
}
As you can see, first thing it does is to import axios and then it creates the apiClient passing a configuration object to the create function of axios. Notice that I'm using an environment variable to load the baseURL which will be the endpoint of the Lambda function that will handle our request. Just remember to create this environment variable after you create you Lambda function (more on this later). In my case, I can use a .env file and Vue CLI will just load them for me when the application starts.
Then the postSubscriber function will receive an object with the subscriber details (name and email) as a parameter and it'll just send a POST request using the apiClient created above. If something goes wrong I'll write the error in console and throw it so it's handled in the catch block in the Vue component.
AWS Lambda first steps
I had no idea how to start with the Lambda functions so the first thing I did was create a default function from scratch using Node.js as a runtime.
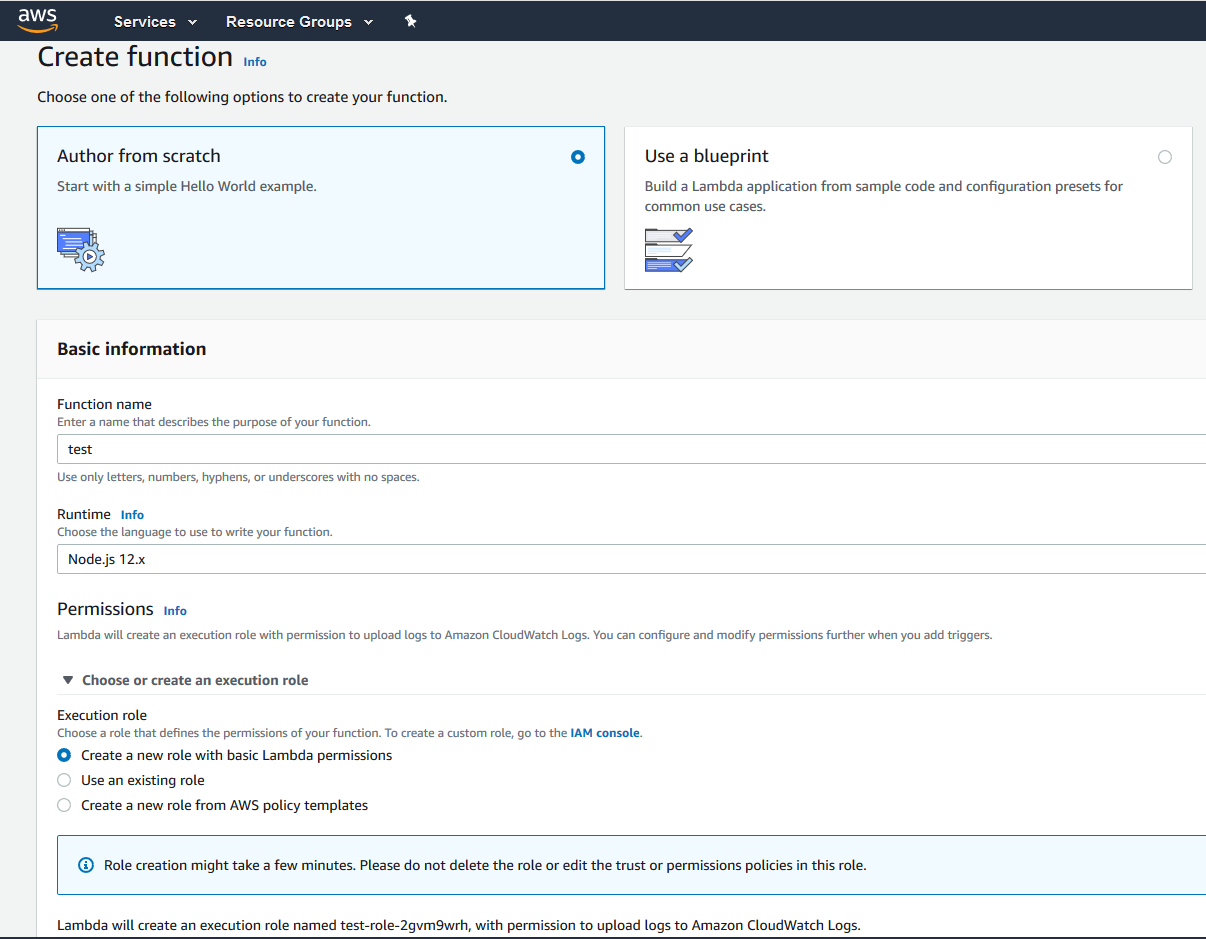
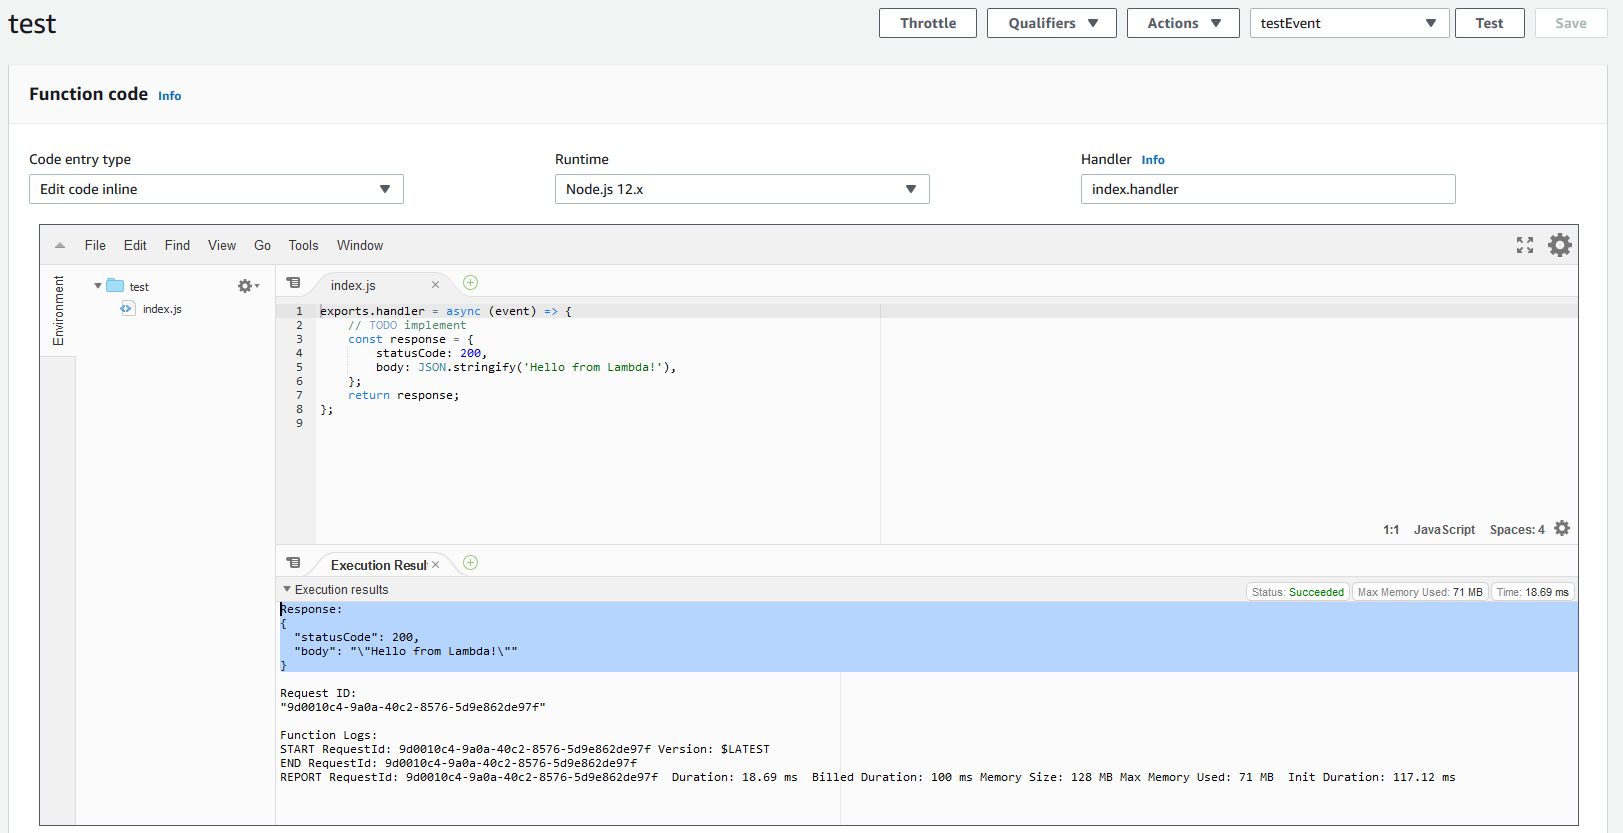
By default this creates a function that returns a hello message. To test it we have to click in the Test button in the top of the page and create an event. Events are different types of requests with different input in the request body. As our current code is not doing anything with the request body, we could leave the default one and test it, but if we want to prepare the event to simulate a subscription request, we can include name and email as the request body and then just use this event to test it.
Now is time to modify the code of the function to actually save the user's name and email in our database. I will be using MongoDB and, in case you dont have one already, you can sign up in Mongo Atlas to get a 500Mb cluster for free. This will be more than enough to store data for a few side projects so it's a really good option. You can find a step by step guide in their docs.
If you're hosting your database somewhere else, you'll need the host, user and password to connect to it.
As the code to store the data in the database is more complex and requires the mongodb dependency we'll use a code editor locally instead of the one in the Lambda console. The first thing we'll do is to create a folder to store all our code, then navigate to it in a terminal and run 'npm install mongodb' to install the mongodb dependency that we'll use to connect and interact with our database. Once the mongodb dependency is installed we can create the Javascript file that will contain all our logic to connect and interact with our database. In my case, I named it subscribe.js.
Notice that we didnt need to run 'npm init' to generate a package.json file as we'll not need to run npm install after deploying our code. Instead we'll upload our code and the node_modules folder to AWS. More on this later.
After searching online for a few tutorials and tips, I found this article about how to create the database connection and even some optimizations for lambda, like caching the database connection to increase performance. From this article I was able to extract a code example that splitted all the logic in four different functions:
-
connectToDatabase: async function that receives the database connection string and returns an opened connection
-
queryDatabase: async function that receives the database connection and the Lambda event (which has the request body). In our case this will have the name and email of the subscriber
-
processEvent: is a wrapper that will call the connectToDatabase and the queryDatabase functions. As these are async functions it will call them using await.
-
handler: this is the default function that is exported and receives as params the event and the context object.
The code from the article uses callbacks but it also contains a link to an example in GitHub which uses asyn/await instead. Let's review the functions one by one:
async connectToDatabase(uri)
const MongoClient = require('mongodb').MongoClient

//Performance optimization Step 1: declare the database connection object outside
//the handler method so it's cached
let cachedDb = null

async function connectToDatabase(uri) {
  try {
    //Performance optimization Step 3: test that database connection exists
    // and is valid before re-using it
    if (cachedDb && cachedDb.serverConfig.isConnected()) {
      console.log('=> using cached database instance')
      return cachedDb
    }
    const dbName = 'MY_DATABASE'
    const client = await MongoClient.connect(uri)
    cachedDb = client.db(dbName)
    return cachedDb
  } catch (error) {
    console.log(error)
    return error
  }
}
As you can see, the variable cachedDb in the main context (not inside any of the functions) and the first thing we do is to check if it already exists and if it's connected. If it already exists we return it and if not, we connect to the server and database and assign it to cachedDb before returning. By declaring cachedDb in the main context we allow AWS Lambda to keep the database connection open for some time and it can be reusable for different executions of our function. This is explained in this section from the official AWS Lambda docs which mentions:
Objects declared outside of the function's handler method remain initialized, providing additional optimization when the function is invoked again. For example, if your Lambda function establishes a database connection, instead of reestablishing the connection, the original connection is used in subsequent invocations. We suggest adding logic in your code to check if a connection exists before creating one.
async queryDatabase(db, event)
async function queryDatabase(db, event) {
  let response = {
    isBase64Encoded: false,
    headers: {
      'Content-Type': 'application/json',
      'Access-Control-Allow-Origin': '*',
    },
  }
  try {
    var jsonContents = JSON.parse(JSON.stringify(event))

    //handling API Gateway input where the event is embedded into the 'body' element
    if (!event.body !== null && !event.body !== undefined) {
      response.statusCode = 420
      response.body = JSON.stringify({
        message: 'Invalid input',
      })
      return response
    }
    console.log('retrieving payload from event.body')
    jsonContents = JSON.parse(event.body)

    if (!jsonContents.name && !jsonContents.email) {
      response.statusCode = 420
      response.body = JSON.stringify({
        message: 'Missing params in request body',
      })
      return response
    }
    const now = new Date()

    const dbResponse = await db.collection('Subscribers').insertOne({
      name: jsonContents.name,
      email: jsonContents.email,
      createdAt: now,
      updatedAt: now,
      __v: 0,
    })
    console.log('New Sub inserted: ', dbResponse)
    response = {
      statusCode: 201,
      body: JSON.stringify({
        message: 'Subscribed ok',
      }),
    }

    return response
  } catch (error) {
    console.log(error)
    return error
  }
}
This function receives the database connection object and the AWS Lambda event. First thing it does is to check if the event contains a valid body and, if not, return the response object with status code 420. If the event has a body, it parses it to JSON with and then checks if it contains a name and email properties. Again, if it doesn't it will return the response with a 420 status code. Lastly, if both validations are passed, it will insert the record in the 'Subscribers' collection and return a reponse with a 201 status code.
A few things to keep in mind are:
- The Access-Control-Allow-Origin header: Make sure you configure it accordingly to your website domain.
- Validations: in this example I'm not validating if the email has a valid format or if the name contain just letters. Although these validations are done in the form in the website, it's important to include them in the back end as well.
- The response body has to be a JSON stringifyed.
async processEvent(event)
async function processEvent(event) {
  try {
    const db = await connectToDatabase(atlas_connection_uri)
    const result = await queryDatabase(db, event)

    console.log('query results: ', result)

    return result
  } catch (err) {
    console.log('Error processing event: ', err)
    return err
  }
}
The processEvent function is just responsible of calling the connectToDatabase and queryDatabase functions using await.
handler(event, context)
exports.handler = async (event, context) => {
  try {
    var uri = process.env['MONGODB_ATLAS_CLUSTER_URI']

    console.log('remaining time =', context.getRemainingTimeInMillis())
    console.log('functionName =', context.functionName)
    console.log('AWSrequestID =', context.awsRequestId)
    console.log('logGroupName =', context.logGroupName)
    console.log('logStreamName =', context.logStreamName)
    console.log('clientContext =', context.clientContext)

    //Performance optimization Step 2: set context.callbackWaitsForEmptyEventLoop to false
    //to prevent the Lambda function from waiting for all resources (such as the database connection) to be released before returning it
    context.callbackWaitsForEmptyEventLoop = false

    if (atlas_connection_uri == null) {
      atlas_connection_uri = uri
      /*
            const kms = new AWS.KMS();
            kms.decrypt({ CiphertextBlob: new Buffer(uri, 'base64') }, (err, data) => {
                if (err) {
                        console.log('Decrypt error:', err);
                        return callback(err);
                }

                atlas_connection_uri = data.Plaintext.toString('ascii');
            })
            */
    }
    const res = await processEvent(event)
    console.log('Handler response is: ', res)
    return res
  } catch (error) {
    console.log(error)
    return error
  }
}
The handler function is the one we'll export and it's actually the one that will handle the request as it's the one we'll put as handler in the AWS Lambda console. It will receive the event (which contains the body of the request) and a context object. The context contains basic info like a unique identifier, the remaining time we have to execute our code etc... This function has two responsabilities:
- Load the database connection string, from and environment variable or, preferibly, from an AWS Secret. This requires us to install the aws-sdk package.
- call the processEvent function
The file with all the code would be similar to the one in this gist.
In order to upload our code to AWS, we have to create a .zip file containing both our index.js file and the node_modules folder. Then go to the AWS Lambda console and in the Code Entry Type dropdown, select Upload a .zip file. Once uploaded, make sure the runtime is still Node.js and that the Handler matches with you index filename and the exported function, in my case 'index.handler'.
In addition, if you're using an environment variable to load your database connection string (as in the example above), remember to add it in the Environment Variables section in the Lambda console. Keep in mind that for this type of sensitive data, it's recommended to use something more secure, like the KMS (Key Management Service), for which there youu can adapt the commented code in handler function.
Now we can test it using the Test button in the top of the screen. We can event create valid events (with name and email) and invalid ones to check if the validations we included in the queryDatabase function are working as expected.
Once we have tested our code using the Lambda console we need a way to trigger it from the outside world and for that we're going to need an API. Luckily for us the AWS API Gateway is going to simplify this task for us.
Create the API in AWS Gateway
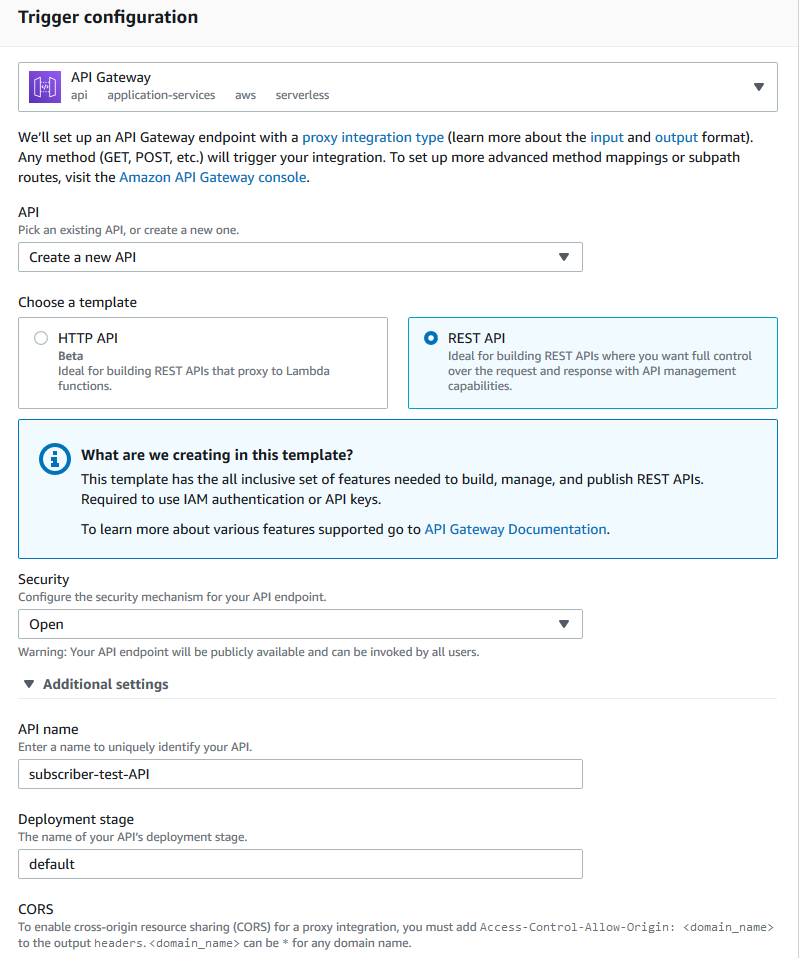
To start creating our API we have to go to the Designer section in the Lambda console, and find the Add trigger button. In the next screen select API Gateway in Trigger Configuration, choose Create new API and REST API as the template. In the Additional settings you can change the API name to whatever you want, leave Deployment stage as default and metrics and error logging disabled for now:
Once done, click the Add button and you new API will be created. Back in the Lambda console you should see the API Gateway as a trigger in the Designer section and if you click on it, you'll see the details and the endpoint of your API.
To test it you can copy the API endpoint and send a request using Postman/Curl. This should work out of the box but if you noticed, by default our endpoint accepts any method (GET, POST, PUT...) and ideally we'll be just listening for POST requests. To fix this, go to the API Gateway service in the AWS console and you should see your API, click on it to see its details. As you can see it has a single endpoint (named /test by default) with "ANY" method. With the Actions button, click on Create method and add the OPTIONS and POST methods. For the OPTIONS one, you'll need to select the Mock integration type and save it. This will make it return a 200 by default withouth actually calling any Lambda function or other code.
Note: we'll need the OPTIONS method as this will be triggered by the browser before actually sending a POST request.
For the POST method we'll select Lambda function as Integration Type, select the Use Lambda Proxy integration and then enter the name of our function in the Lambda function field. We'll get a popup with the message "You're about to give API Gateway permission to invoke your Lambda function", so click Ok. Now we can actually remove the ANY method using the Actions button as we'll be using only POST/OPTIONS requests.
Once done, you'll have to re add the trigger for your function in the Lambda Designer section and you should be ready to go.
Conclusion
I think serverless functions can be very useful when starting a new project or even to handle all the backend in small applications. In my case, I plan to use them for small isolated tasks in my side projects like this subscription example. In addition I plan to start writting them in other programming languages like Python and Go as it could be a nice way to start learning them 😄
Hope this helps you start playing with serverless functions
Happy coding!
If you enjoyed this article consider sharing it on social media or buying me a coffee ✌️
Oh! and don't forget to follow me on Twitter where I share tons of dev tips 🤙
my projects
Apart from writing articles in this blog, I spent most of my time working on my personal projects.
theLIFEBOARD.app
theLIFEBOARD is a weekly planner that helps people achieve their goals, create new habits and avoid burnout. It encourages you to plan and review each week so you can easily identify ways to improve your productivity while keeping track of your progress.
Sign upSolidityTips.com
I'm very interested in blockchain, smart contracts and all the possiblilities chains like Ethereum can bring to the web. SolidityTips is a blog in which I share everything I learn about Solidity and Web3 development.
Check it out if you want to learn SolidityQuicktalks.io
Quicktalks is a place where indie hackers, makers, creators and entrepreneurs share their knowledge, ideas, lessons learned, failures and tactics they use to build successfull online products and businesses. It'll contain recorded short interviews with indie makers.
Message me to be part of it