How I built a new year resolutions web app
Last updated
Antonio Ufano
I've been working in a side project named theLIFEBOARD for a few weeks now. Its main purpose is to help people identify and achieve their goals by creating habits. We know this seems like a very wide and difficult to tackle problem but we think it's just a matter of creating a service focused on few key principles we've been following in our life for the last couple of years:
- Asking the right questions
- Organisation & motivation
- Plan and review each week
- Sharing your success and the failures
- Reward consistency
Our service is still far from being ready for users but we wanted to launch something that users could benefit from before the end of the year and also check if it triggered some interest so, being almost at the end of the year, we decided we could create a new year resolutions exercise.
This is something that we do every year and we really like to reflect back and review the things that we did, which ones we completely forgot or couldn't do, how our preferences have changed and analyse why and in general, see how we as persons have changed in the last 365 days. So we thought that including this exercise as part of our project would be a very good introduction letter to potential users.
When working in a big project, I usually do a detailed technical architecture but when I'm building something small I jump straight to my code editor and improvise the architecture as I progress. My main goal with this article is to explain all the different options I explored while I was coding, taking into account pros and cons of each, like if the time invested to implement a more robust design is worth the received return.
If you just want to see the exercise, you can find it in this link but if you're interested in how I built it and the different options I explored during the process, just keep reading 😉
What is the exercise about?
The idea was pretty basic:
- Anyone can visit the exercise page, no login required
- The exercise is a step-by-step questionnaire and it's meant to be completed in one go
- At the end of the exercise, we ask for the user's name and email before storing the responses in our database
- Send a confirmation email right after the exercise is completed
- One year after completion, user's will receive an email with their details
With these things in mind I jumped to code. We already had a website with a landing page built in Vue.js (bootstrapped with Vue CLI) which includes Vue Router, so adding a new page is as simple as creating a new file in the views folder named NewYear.vue and include a new route in the router.js file pointing to it:
// router.js file
import Vue from 'vue'
import Router from 'vue-router'

// import views
import Home from './views/Home.vue'
const NewYear = () => import('@/views/NewYear.vue')

Vue.use(Router)

export default new Router({
  mode: 'history',
  base: process.env.BASE_URL,
  routes: [
    {
      path: '/',
      name: 'home',
      component: Home,
    },
    {
      path: '/newyear',
      name: 'year review and planning',
      component: NewYear,
    },
  ],
})
That's all needed to add new pages to a Vue.js project. Now I just had to build the exercise in the NewYear.vue file
Building the exercise view
I wanted to divide the exercise in multiple steps so users are aware of how many remaining questions they have left. I could have built something from scratch but, I was already using Vuetify in the landing page and luckily for me, it contains a stepper component which does exactly what I wanted. After going through the documentation, it looked like the template and inner components was different depending if the stepper was horizontal or vertical:
For horizontal steppers, the components to use are:
-
v-stepper to wrap everything.
-
v-stepper-header which has to contain multiple v-stepper-step components (one for each step) and v-dividers.
-
v-stepper-items which has to contain one v-stepper-content for each step.
For vertical steppers, the components are:
- v-stepper: to wrap everything.
- v-stepper-step and v-stepper-content directly as childs of the v-stepper, one per step.
So the vertical one requires less components in general and, thinking mobile-first, I decided to go for the vertical one. Next was to review the required variables to make it work.
-
The v-stepper component requires a v-model with a numeric variable (I named it stepper) to track which content to display and the vertical property.
-
Each v-stepper-step requires a step property with a numeric value (first one has 1, second has 2....). The complete property marks the step as complete so I'll bind it to the result of checking if the variable used in the v-stepper is bigger than its own step property:
-
Each v-step-content just requires a step property, similar to the one in v-stepper-step.
You can find a full code example in the Vuetify docs.
In order to move back and forward between the steps I included buttons inside each v-step-content component that will call a function named moveToStep(n) . This function receives the number of the destination step and updates the stepper variable used by the v-stepper component. In addition, this function takes care of focusing on the inputs and reseting the forms that appear in multiple steps:
    moveToStep(stepNumber) {
        // actually moves to the step
        this.stepper = stepNumber
        // other controls of forms
        switch (stepNumber) {
            case 1:
              // Welcome step
              // reset form so it does not appear with error alert when going back to step 2
              this.$refs.formTaskDone.reset()
              break

            case 2:
              // Review the Goods
              this.$refs.taskDoneName.focus()

              break
            case 3:
              // Review, the Bads
              this.$refs.formTaskDone.reset()
              this.$refs.taskUndoneName.focus()

              break
            case 4:
              // New year Plans
              this.$refs.formTaskUndone.reset()
              this.$refs.newTaskTodo.focus()

              break
            case 5:
              // NewYear, the word
              this.$refs.formTaskNewYear.reset()
              this.$refs.inputYearWord.focus()

              break
            case 6:
              // Review step
              this.$refs.detailsName.focus()

            default:
              console.log('In default')
              break
          }
        }
Most of the v-step-content components contain forms with questions like the good and bad things from last year. All the questionnaire fields are bounded to variables so at the end of all the steps, I have all the user's answers stored inside the component's data object of the view. I though about saving the answers in localStorage between steps but that's wasn't really adding any value to the exercise so I discarded it at the end. The only downside is that if a user refreshes the page halfway though the exercise, he/she will lose all the answers 😞
Storing the responses
To store the user's responses I opted for a Lambda function that will receive a POST request and store the data in a Mongo database running in Mongo Atlas. This is the same approach I used to build the subscription form for our project's landing page so if you want to see a step by step guide on how to do it, you can check this article I wrote a few weeks ago. In summary, the required pieces are:
- Mongo database (you can get one free with Mongo Atlas)
- Lambda function in Node.js that receives an object with the responses, does some validations and saves it in the database using the mongodb package
- An AWS API that exposes the endpoint the Vue.js application will send the request to
One of the tricky things when dealing with APIs is CORS as if the API is not returning the proper headers to the front end, the browser will block the requests. If you're not familiar with CORS I really recommend checking this article as it explains what it is very well. In AWS API Gateway you can enable CORS using the following option:
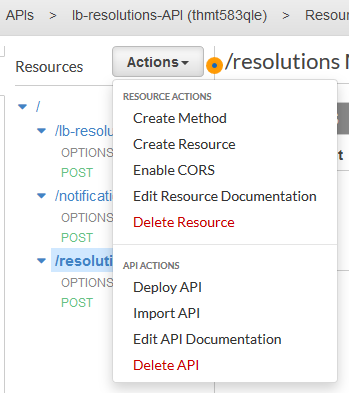
Once CORS is enabled, the API will expose an OPTIONS endpoint which will return the required headers and should be reachable from our front end.
To make the request to the API, I created a file named NewYearService.js which uses axios to create the object with the API details, like the URL. It also exports the function postResolutions(resolutions) that receives an object with all the user's responses and makes the POST request to the API:
// NewYearService.js file
import axios from 'axios'

const apiClient = new axios.create({
  baseURL: `https://my-base-url.aws.lambda.com`,
  withCredentials: false,
  headers: {
    Accept: 'application/json',
    'Content-Type': 'application/json',
  },
})

export default {
  async postResolutions(resolutions) {
    try {
      const res = await apiClient.post('/resolutions', resolutions)
      console.log(`Posted ok! ${res.data}`)
      return res
    } catch (err) {
      console.error(err)
      throw err
    }
  },
}
Then in the NewYear.vue view file I just have to import the NewYearService.js file and create a method that calls the postResolutions() function:
    // part of NewYear.vue file
    ........
      methods: {
        submitYear() {
          console.log('sending resolutions...')

          this.isLoading = true
          if (this.$refs.submitYearForm.validate()) {
            NewYearService.postResolutions({
              done2019: this.listDone,
              undone2019: this.listUndone,
              resolutions2020: this.listNewYear,
              word2020: this.yearWord,
              name: this.userName,
              email: this.userMail,

            })
              .then(res => {
                this.isLoading = false
                // move to next page
                this.stepper++
              })
              .catch(err => {
                this.isLoading = false
                this.alertMessage =
                  '🤕 There was an error saving your data. Please try again'
                this.showAlert = true
              })
          } else {
            this.isLoading = false
          }
        },
        ......
Sending the confirmation email
I thought about using an event system (like AWS SNS) that triggers a message every time the user's resolutions are stored in the database and then capture the events to send the emails asynchronly but that was adding a lot of complexity and I wanted to finish the exercise as soon as possible so I opted again for using a Lambda function which I'd call right after the one to store the data finished.
I've done emails in previous projects and the easiest way I know to send them with Node.js is using the nodemailer package. With nodemailer you just need your email SMTP server and account details to create an email transport and send it. Find below a small example that sends an HTML email:
const nodemailer = require('nodemailer')
const fs = require('fs')

let transport = nodemailer.createTransport({
  host: 'YOUR_SMTP_SERVER',
  port: 'YOUR_SMTP_PORT',
  auth: {
    user: 'YOUR_SMTP_USER',
    pass: 'YOUR_SMTP_PASS',
  },
})

// Read email html template file
const mailHtml = fs.readFileSync('./email.html')
// Create HTML email
const message = {
  from: 'YOUR_SMTP_USER',
  to: 'antonio@mydomain.com',
  subject: 'This is a test email',
  html: mailHtml.toString(),
  attachments: [
    { filename: 'image.jpg', path: 'https://mydomain.com/img/image.jpg' },
  ],
}

// Send mail
transport.sendMail(message, function (err, info) {
  if (err) {
    console.log(err)
  } else {
    console.log(info)
  }
})
I started creating the HTML template manually but soon I noticed that I was going to spend a lot of time to get a decent design that worked in multiple devices so I searched online and found beefree.io . It has a super easy to use (and free!) drag&drop designer that allows you to download the HTML file so it was super handy.
To trigger the Lambda that sends the email, I added a new endpoint in the API that I created to store the resolutions and then added a new function named sendMail() in my NewYearService.js file. This function would receive an object with the user's email address, name or whatever I want to include in the email:
    // NewYearService.js file
    export default {

      async sendMail(userDetails) {
        try {
          const res = await apiClient.post('/notifications', userDetails)
          console.log(`Mail queued ok! ${res.data}`)
          return res
        } catch (err) {
          console.error(err)
          throw err
        }
      },
      async postResolutions(resolutions) {...}
    }
Then I included the call to this function right after I receive a response from the API that stores the resolutions in the database:
    //part of NewYear.vue file
    methods: {
        submitYear() {
          console.log('sending resolutions...')

          this.isLoading = true
          if (this.$refs.submitYearForm.validate()) {
            NewYearService.postResolutions({
              done2019: this.listDone,
              undone2019: this.listUndone,
              resolutions2020: this.listNewYear,
              word2020: this.yearWord,
              name: this.userName,
              email: this.userMail,
            })
              .then(res => {
                // resolutions stored in the DB :)
                this.isLoading = false
                // move to next page
                this.stepper++
                // Call to API to send the email
                return NewYearService.sendMail({
                  name: this.userName,
                  email: this.userMail,
                })
              })
              .catch(err => {
                this.isLoading = false
                this.alertMessage =
                  '🤕 There was an error saving your data. Please try again'
                this.showAlert = true
              })
          } else {
            this.isLoading = false
          }
        },
        ...
Sending the email within a year
This part is still in progress but my firs idea is the following:
- Create a new HTML template for the email with dynamic content that I can replace with the user's data
- Create a cron job that runs daily
- It will query the database that contains the user's resolutions filtering by the date (when it runs the 24th of December 2020, it will filter by 24th December 2019)
- For each returned result, send an email containing the user's resolutions
I have almost a year to do this but if you have any suggestions on how you'll do it, they are more than welcome
Hope you've learnt something useful from this article and, if you want to check the exercise, you can find it here.
Happy new year and happy coding!
If you enjoyed this article consider sharing it on social media or buying me a coffee ✌️
Oh! and don't forget to follow me on Twitter where I share tons of dev tips 🤙
Other articles that might help you
my projects
Apart from writing articles in this blog, I spent most of my time working on my personal projects.
theLIFEBOARD.app
theLIFEBOARD is a weekly planner that helps people achieve their goals, create new habits and avoid burnout. It encourages you to plan and review each week so you can easily identify ways to improve your productivity while keeping track of your progress.
Sign upSolidityTips.com
I'm very interested in blockchain, smart contracts and all the possiblilities chains like Ethereum can bring to the web. SolidityTips is a blog in which I share everything I learn about Solidity and Web3 development.
Check it out if you want to learn SolidityQuicktalks.io
Quicktalks is a place where indie hackers, makers, creators and entrepreneurs share their knowledge, ideas, lessons learned, failures and tactics they use to build successfull online products and businesses. It'll contain recorded short interviews with indie makers.
Message me to be part of it